
The KUKA robot was having problems with the system drive. The best action was to ddrescue the drive and replicate it onto another medium, then apply the boot sector fixes that were damaged by power cycling the machine. By moving the data from a failing IDE HDD to a stable CF card, we ensure the robot’s “immortal” backup is clean and ready for deployment. Let’s see how it is done. I left all the commands in the article for the future reference.
Step 1. Capture the Raw Data
First, I used ddrescue to pull every bit of data off the failing IDE drive. Unlike standard copy commands, this tool handles hardware errors gracefully without crashing.
Command
sudo ddrescue -d -r3 /dev/sdb ~/kuka_master.img ~/kuka.logfileExplanation
-d: Uses direct disc access to bypass the kernel cache.-r3: Retries bad sectors 3 times to get a perfect read.~/kuka.logfile: Keeps track of progress so if the drive disconnects, it resumes where it left off.
Step 2. Replicate to the New Medium
Once I had the raw .img file, I replicated it onto an industrial CF card. This effectively clones the entire physical structure of the old drive onto the new solid-state hardware.
Command
sudo dd if=~/kuka_master.img of=/dev/sdb bs=4M status=progress conv=fsyncExplanation
-
if: The source (Input File). of: The target CF card (Output File).conv=fsync: Forces the data to physically write to the card before finishing.
Step 3. Attempt to Repair the Damage
Because the machine was power cycled while the drive was writing or just failing due to its age, the filesystem was possibly ‘damaged’. I applied logic fixes to the new medium to ensure it would boot in the robot cabinet.
Fixing the NTFS (Windows) Partition
sudo ntfsfix /dev/sdb1Fixing the FAT/Data Partitions
sudo fsck -y /dev/sdb5 (and sdb6)Explanation
- These commands reset the “dirty bit” and repair metadata errors caused by improper shutdowns, making the OS stable again.
Step 4. Verify the Boot Sector
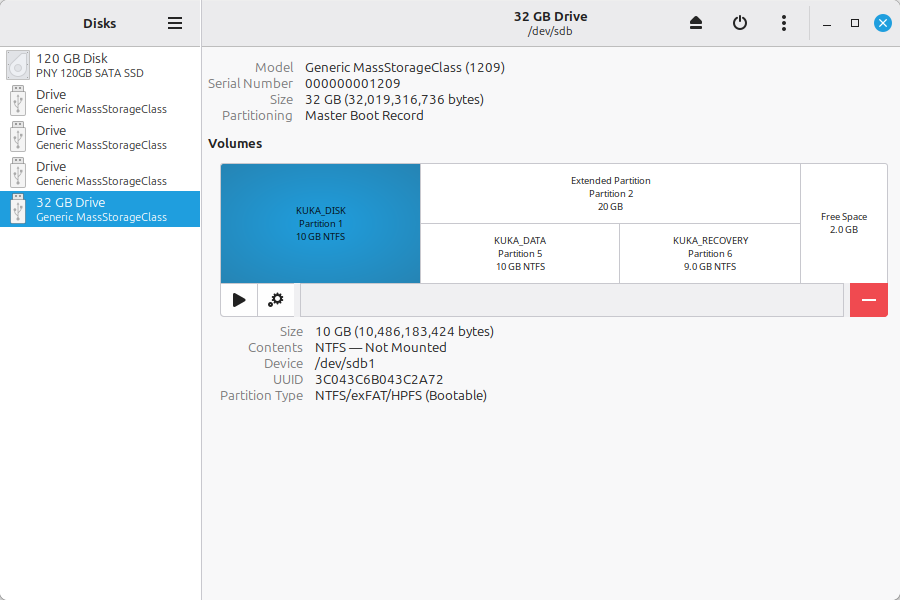
For the KUKA controller to recognize the drive as a startup disk, the primary partition must be marked Active.
Verification
Open the Disks Utility (gnome-disks) and select the CF card.
What to look for
Ensure Partition 1 shows “Bootable” in the details. If it doesn’t, the robot will skip the drive and fail to load.
Step 5. Finalize the “kuka_fixed.img” Image
After applying the fixes, I created a final, “clean” image of the repaired CF card. This is now the permanent backup that can be burned to any drive in the future without needing further repairs.
Command
sudo dd if=/dev/sdb of=~/Documents/kuka_fixed.img bs=4M status=progress conv=fsyncResult
We now have a single file (kuka_fixed.img) that can be replicate to any other device in 5 minutes if a robot drive ever dies again. It’s important to keep this file on an external storage, some sort of ‘backup HDD’ / cloud solution, for long-term safety.
Step 6. Copying the ‘master’ and ‘fixed’ images with progress bar
Old PC and big files equals long, unknown copying time. Using the below command helps to understand the time required to finish copying the master and fixed images to a new location:
Command
rsync -ah --progress SOURCE TARGETShoutout to Linux Mint
Ubuntu would not install on this specific, old PC setup. Linux Mint did not care and was the real hero of this operation.
Download at https://linuxmint.com